Difference between revisions of "Revenge Class Battleship (1914)"
m (→Rangefinders) |
|||
| Line 60: | Line 60: | ||
Sometime, likely not before 1918, these were to be upgraded to 15-foot instruments, probably also F.T. 24, with new armoured hoods and racers and training driving the hood directly rather than through the rangefinder mounting. These rangefinders lacked hand-following gear to facilitate in transmission of range cuts, and when it was considered as an addition around 1917, space concerns were causing issues.<ref>''Annual Report of the Torpedo School, 1917'', p. 198. (C.I.O. 481/17)</ref> | Sometime, likely not before 1918, these were to be upgraded to 15-foot instruments, probably also F.T. 24, with new armoured hoods and racers and training driving the hood directly rather than through the rangefinder mounting. These rangefinders lacked hand-following gear to facilitate in transmission of range cuts, and when it was considered as an addition around 1917, space concerns were causing issues.<ref>''Annual Report of the Torpedo School, 1917'', p. 198. (C.I.O. 481/17)</ref> | ||
| + | |||
| + | By 1918, two additional 9-foot instruments were also to be provided for torpedo control. On ''Ramillies'', these were situated on each side of the lower searchlight bridge, requiring manipulating hut #1 to be resited forward and its roof lowered a bit. On the other ships, the RFs were placed on either side of the upper searchlight structure, inboard of #3 searchlight.<ref>''Annual Report of the Torpedo School, 1918'', p. 177.</ref> | ||
===Evershed Bearing Indicators=== | ===Evershed Bearing Indicators=== | ||
Revision as of 16:21, 9 April 2011
Contents
Armament
Guns
8 15-in guns and 14 6-in guns arranged for broadside firing.
Torpedoes
4 Service Bar 21-in submerged broadside tubes depressed 2 degrees and bearing 90 degrees.[1]
Fire Control
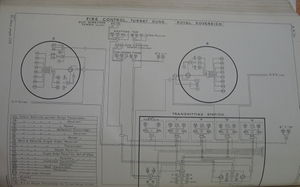
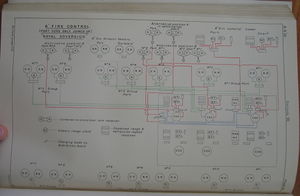
There is an extensive set of diagrams and description of the fire control outfits of these ships in the Annual Report of the Torpedo School, 1915.
Phones
Main Battery
All phones for the main battery fire control was based on Pattern 333X Navyphones.[2]
The 15-in TS had an exchange board in communication with the ship's main navyphone exchange board. It had four exchange navyphones wired up to it, allowing them to converse with the following remote navyphones:
"Order" navyphones in:
- 'A' turret
- 'B' turret
- 'X' turret
- 'Y' turret
- Gun control tower
- Spotting top
- 'A' turret (fall of shot)
"Control" navyphones in:
- Gun control tower
- 'X' turret
"Director fire" navyphones in:
- 'X' turret
- Light aloft director tower
- Armoured director tower
"Range" navyphones in:
- Spotting top
- Gun control tower
- 'A' turret
- 'B' turret
- 'X' turret
- 'Y' turret
In addition to the four general-use navyphones in the 15-in TS, the remote "range" navyphones in the turrets could also be directly addressed via four Pattern 3334 Navyphones wired into the TS's exchange board. A multiple plug permitted one of these to address all four turrets at once, if desired. Additionally, a navyphone in the conning tower was also connected to this exchange board.
Lastly, 'X' turret's working space had a navyphone to the 15-in TS, working off a battery.[3]
Secondary Battery
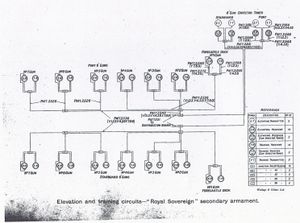
Each 6-in gun control tower, port and starboard had a Pattern 3331 Navyphone wired directly to the 3 groups' C.O.S. on its side. In the 6-in TS, six Pattern 3332 Navyphones were wired directly to their own group C.O.S., which each had 2 positions:
- 6-in GCT to all guns of its broadside
- TS group navyphone to its own group
The TS phones had switches which permitted one phone to pass orders to the whole broadside. Each officer of group had a Pattern 3333 Navyphone, and each gun was equipped with telaupads. Lastly, each 6-in gun director tower had a Pattern 3330 Navyphone wired directly to a Pattern 3332 Navyphone in the TS.[4]
Rangefinders
The rangefinder in the TCT was a 9-foot F.T. 24 on an M.Q. 10 mounting.[5][6][7]
Sometime, likely not before 1918, these were to be upgraded to 15-foot instruments, probably also F.T. 24, with new armoured hoods and racers and training driving the hood directly rather than through the rangefinder mounting. These rangefinders lacked hand-following gear to facilitate in transmission of range cuts, and when it was considered as an addition around 1917, space concerns were causing issues.[8]
By 1918, two additional 9-foot instruments were also to be provided for torpedo control. On Ramillies, these were situated on each side of the lower searchlight bridge, requiring manipulating hut #1 to be resited forward and its roof lowered a bit. On the other ships, the RFs were placed on either side of the upper searchlight structure, inboard of #3 searchlight.[9]
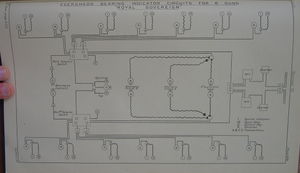
Evershed Bearing Indicators
All 5 units were fitted with this equipment, at least for main and secondary batteries.
Mechanical Aid-to-Spotter
At some point, all ships in this class were equipped with four Mark II Mechanical Aid-to-Spotters:
- one on each side of the foretop, driven by flexible shafting from the Evershed rack on the director
- one on each side of the Gun Control Tower employing an electrical F.T.P. system.
As the need for such gear was apparently first identified in early 1916, it seems likely that these installations were effected well after Jutland.[10]
Gunnery Control
The control arrangements were almost certainly developed along lines similar to the King George V class, outlined here as follows.[Inference]
Control Positions
- Gunnery control tower
- 'B' turret
- 'X' turret
Control Groups
Main Battery
The four 15-in turrets were each a separate group with a local C.O.S. so that it could be connected to
- Transmitting Station
- Local control from officer's position within turret
Secondary Battery
The secondary battery fire control was very similar to arrangements in Queen Elizabeth, but with fourteen rather than sixteen 6-in guns which were divided into 3 groups on each broadside:[11]
- 2 guns
- 3 guns
- 2 guns
The transmitting sources illustrated in the Annual Report of the Torpedo School, 1915 are quite lavish and indicate a strong belief in the value of the secondary battery.[12] Each of the 3 groups, port and starboard (6 in all), received its range, deflection and firing signals from one of 4 sources:
- from its own transmitter kit the TS (6 there, dedicated to group)
- a similar but not identical broadside transmitter kit located in the 6-in gun control tower (2 there, dedicated to broadside)
- a Spartan alternative control position "A" in the spotting top (2 there, dedicated to broadside)
- a Spartan alternative control position "B" elsewhere (6 there, dedicated to group)
Each of the 6 groups had a 4-way COS in the TS to determine which source would inform the guns of its group.
The COSes each had a combined range and deflection receiver monitoring its output indications for use as a tally and also as a repeat to the use of the group's transmitter in the TS. Those 6 group transmitting kits were capable of generating range, deflection and firing signals. The range and deflection were entered by hand crank, and the operator used the combined tally device to know what value was going out.
The 2 broadside transmitter kits in the 6-in GCT were the most elaborate, as they each had a Vickers range clock to supply its range data. Otherwise, they were similar to the group kits in the TS below.
Alternative control position "A" had 2 small transmitting kits, one for each broadside. These were more Spartan than the main ones as they had no range clock and substituted a range transmitter and a deflection transmitter, each with an integral repeat. The outputs fed all 6 group COSes in the TS.
Alternative position "B" was more extensively furnished as it had 6 of these Spartan kits, one for each group. The output of each was fed directly to the COS for its group in the 6-in TS below. .[13]
A fall-of-shot transmitter in the spotting top worked receivers in each 6-in gun control tower.[14]
Directors
Main Battery
These ships were completed with 2 cam-type tripod-mounted directors, one in an armoured tower and one in a light aloft tower,[15] as well as a directing gun in the 'X' turret.[16]
The battery's fire could be divided into fore ('A' & 'B') and aft ('X' & 'Y') groups, with a C.O.S. in the TS affording these options:[17][18]
- all on aloft director
- all on armoured director
- all on directing gun
- forward group on aloft director, aft group on armoured director
- forward group on armoured director, aft group on directing gun
The main and auxiliary firing circuits had paired pistols in all 3 director positions, and were wired through the same C.O.S. as the training and elevating circuits. In the turret's firing circuits fed a "trainer's switch", which could be "on" or "off", and then to a 3-way C.O.S. at each gun to select which director firing circuit was tied to which gun firing circuit:
- main on main, aux on aux
- main on aux, aux on main (crossover)
- local firing circuits
Secondary Battery
The 6-in broadside guns were supported by a pair of pedestal-mounted directors, installed in March and April 1917, except in in Ramillies (June 1918).[19] These were situated to port and starboard on her forward superstructure. There were no options to use a director other than the one on the given broadside. The firing circuits were similarly straightforward, with each gun and director having a C.O.S. offering probably the same options as for the main battery guns:[20][21][22] [Inference]
- main on main, aux on aux
- main on aux, aux on main (crossover)
- local firing circuits
Queen Elizabeth's systems were noted as being quite similar.[23]
Transmitting Stations
There were separate TSes for 15-in and 6-in batteries.[24]
The 6-in TS's arrangement is illustrated in the control section above.
Dreyer Table
These ships each had a Mark IV* Dreyer Table (though it is possible Ramillies had a Mark V Dreyer Table),[25] and 4 (?) Dreyer Turret Control Tables.[26]
Fire Control Instruments
It is likely that the ships continued the pattern first established in the Colossus class, all 5 units used Vickers F.T.P. Mark III range and deflection instruments to the gun sights and Barr and Stroud (probably Mark II*[Inference]) instruments for other purposes.[27]
The ships had Gun Ready signals in the TS and control positions, but had no Target Visible signals.[28]
Torpedo Control
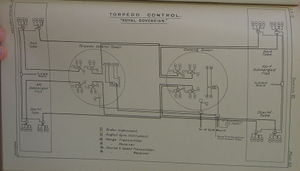
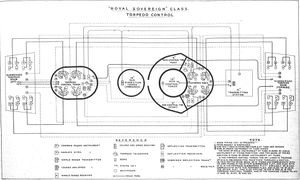
As the diagram in ARTS 1915 makes clear, control could be exercised from either the aft torpedo control tower or the conning tower, and each tube had a set of instruments for communicating with each, obviating the need for a change-over switch.
By mid 1917, if not at completion, the ships were fitted with a Torpedo Control Plotting Instrument Mark II in the TCT.[29]
Phones
The phones were generally Pattern 333X Navyphones, except that Pattern 2465 special transmitters wired in parallel to the navyphones were used from either torpedo control position when addressing tubes at the opposite end of the ship.[31]
In the torpedo control tower:
- Four Pattern 3331 Navyphones, one addressing each tube
- Two Pattern 2465 special transmitters wired in parallel to the 3331's addressing the forward tubes
- One 3331 to the 15-in TS
- One 3331 to the gun control tower
- One 3331 to the conning tower (the forward torpedo control position)
In the conning tower:
- Two Pattern 3331 Navyphones, one addressing each after tube
- Two Pattern 2465 special transmitters wired in parallel to the 3331's addressing the after tubes
- One 3331 to the 15-in TS
- One 3331 to the torpedo control tower (the after torpedo control position)
I infer from the lack of navyphones in the conning tower to reach the forward torpedo tubes that these might have enjoyed voicepipe connectivity.[Inference]
See Also
Footnotes
- ↑ Annual Report of the Torpedo School, 1915, p. 36.
- ↑ Annual Report of the Torpedo School, 1915, p. 230.
- ↑ Annual Report of the Torpedo School, 1915, p. 231.
- ↑ Annual Report of the Torpedo School, 1915, p. 231.
- ↑ Annual Report of the Torpedo School, 1917, p. 198.
- ↑ Annual Report of the Torpedo School, 1918, p. 175.
- ↑ Inferences M.Q. 10 and F.T. 24
- ↑ Annual Report of the Torpedo School, 1917, p. 198. (C.I.O. 481/17)
- ↑ Annual Report of the Torpedo School, 1918, p. 177.
- ↑ The Technical History and Index: Fire Control in HM Ships, 1919, pp. 25-6.
- ↑ Annual Report of the Torpedo School, 1915, p. 231.
- ↑ Annual Report of the Torpedo School, 1915, Plate 114.
- ↑ Annual Report of the Torpedo School, 1915, Plate 114.
- ↑ Annual Report of the Torpedo School, 1915, p. 231.
- ↑ The Director Firing Handbook, 1917. p. 142.
- ↑ The Director Firing Handbook, 1917. pp. 88, 142.
- ↑ The Director Firing Handbook, 1917. pp. 88-9.
- ↑ Annual Report of the Torpedo School, 1915, p. 232.
- ↑ The Technical History and Index, Vol. 3, Part 23. 191, p. 16.
- ↑ The Director Firing Handbook, 1917. p. 143.
- ↑ The Director Firing Handbook, 1917. Plate 79.
- ↑ The Director Firing Handbook, 1917. Plate 80.
- ↑ Annual Report of the Torpedo School, 1915, p. 232.
- ↑ Annual Report of the Torpedo School, 1915, pp. 230-1.
- ↑ Handbook of Capt. F.C. Dreyer's Fire Control Tables, p. 3.
- ↑ Handbook of Capt. F.C. Dreyer's Fire Control Tables, p. 3.
- ↑ Handbook for Fire Control Instruments, 1914, pp. 72.
- ↑ Handbook for Fire Control Instruments, 1914, p. 11.
- ↑ Handbook of Torpedo Control, 1916, p. 38.
- ↑ Handbook of Torpedo Control, 1916, Plate 28.
- ↑ Annual Report of the Torpedo School, 1915, p. 230.
Bibliography
- Template:BibUKFireControlInHMShips1919
- Admiralty, Gunnery Branch (1914). Handbook for Fire Control Instruments, 1914. G. 01627/14. C.B. 1030. Copy 1235 at The National Archives. ADM 186/191.
- Template:BibUKFireControlInHMShips1919
- Template:BibUKDirectorFiringHandbook1917
- Template:BibUKDreyerTableHandbook1918
- Template:BibUKARTS1915
- Template:BibBritishBattleshipsofWorldWarTwo


