Dreyer Table Mark III
The Mark III Dreyer Table was a refined version of the Original Dreyer Table and was the first Dreyer Fire Control Table provided for naval service, first deployed in 1912 in Monarch.[1]
<video id="iZZ7wdnRLsE" height="300" width="400" frame="false" position="right"/>

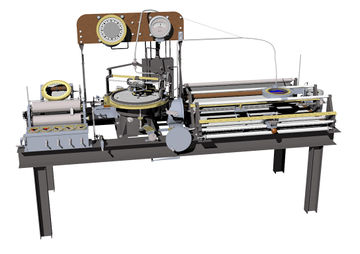
This illustrates the Standard Bearing Plot and its Deflection Totaliser which were featured so prominently in the 1918 Handbook, but which may never have been widely deployed if at all.
Development

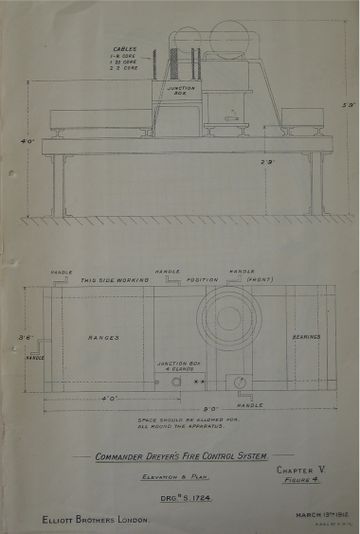
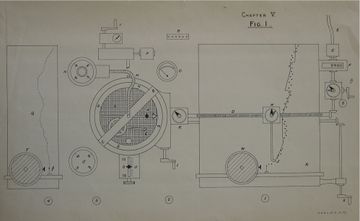
This early drawing focuses only on the general layout, but it is clear from the overall context that the early thinking was correct to the extent that it was never revisited, and the headboard is even in place, illustrating the early focus on helm-free design from the gyro-compass and relay that are already outlined there. The early bearing plot runs the depth of the table, and the bearing clock is also clearly indicated by the handle on the dumaresq.

This drawing illustrates detailed thinking on positioning the components on the table and integrating their function as required. The design of the dumaresq and its underslung bearing clock may have been completed, as its handle is now angled as it would remain in subsequent drawings.

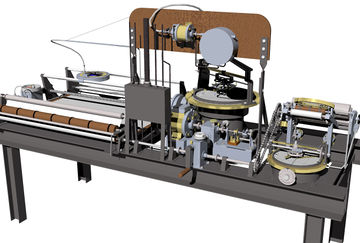
Another view of the same configuration rendered above shows a Wind Dumaresq on the right would have occupied the area freed up by use of the smaller bearing plot.
Five of what was to become known by March 1914 as the Mark III tables were ordered in February 1912 even as the design was being finalised. It generally resembled the capabilities of the original Dreyer table, but by March 1912, it boasted these improvements:
- the paper plots were now driven by electric motors (with a fallback to hand crank)
- the components reorganized to place the bearing plot on the left, dumaresq in centre and range plot on right
- dumaresq now had a means to have a gyro-compass relay update own ship's heading
- a backboard was fitted to display a gyro-compass receiver and Forbes Log.
- a cylindrical deflection drum was added to the bearing plot to relate bearing rate to Dumaresq Deflection.
By February 1913, the design had further matured to "probably include" the following:[2]
- A bearing clock was added to help keep dumaresq updated for enemy bearing.[3]
- A second deflection drum was to be added to the bearing plot to relate bearing rate to Gun Deflection.
- Automatic transmission of ranges to the guns. The design drawing for what would later be called
- The differential gear (later known as the spotting corrector) considered optional in previous drawings was to be issued with all further tables.
- A means of transferring rates from dumaresq to range clock.[4]
- A means of factoring in own ship's lateral slip through the water as it turns, but this did not work out readily and was deferred in July 1914, and allowed to fall into obscurity.[5]Slip was handled inelegantly even in postwar use of late model Dreyer tables.[Citation needed]
- Plans to relay enemy heading and range rate to the control position (possibly this was considerably delayed, later to be manifested as ''The Repeater'' outlined in the 1918 Handbook.
- A Time-of-Flight corrector for gun range was mentioned, but this correction continued to be calculated by the separate Dreyer Calculator and entered via the spotting corrector differential throughout the war and into the 1930s.[6]
- Equipment to permit the plotting of ranges from multiple rangefinders. This did not happen promptly. See the discussion on the general evolution of Dreyer range plots.
| Overall Dimensions (1918)[7] | |
| Width | 9 feet, 1.5 inches |
| Depth | 4 feet, 2 inches |
| Height of Range Rate Grid | 3 feet, 5 inches |
| Height of top of dumaresq | 5 feet, 9 inches |
Motive Power
Power for drawing paper through the plots and the range and bearing clocks was provided by an electric motor with a speed governor. Should power fail, an alternate hand-drive placed behind the table could be used. The person working this handle observed a stop-watch in a box behind an etched glass cover which revolved as he worked his handle. By keeping the etching in line with the stopwatch's hand, the correct speed to regulate the table's activity was delivered.
The Mark III's power source established a design pattern followed closely by later models except the Mark I and Mark I* which relied solely on hand crank power.
Dumaresq
An adapted Dumaresq Mark VI with fixed and simplified dial plate was fitted, with a means of permitting the gyro-compass to maintain own heading. A bearing clock and range clock were housed underneath it.
Range Clock
The range clock was underneath the dumaresq and the handle for setting its range rate also moved an indicator in a slot along the line of bearing in the dumaresq's fixed dial plate. In this arrangement, when the operator kept this indicator in line with the dumaresq's enemy bar indicator, he was maintaining a consistent range rate for the hypothesis established by the present dumaresq configuration.
The range clock's output shaft fed a differential which drove the carrier for the red clock range pencil across the range plot and permitted a tuning handle to quickly position the pencil to the desired range.
Bearing Clock
A bearing clock with a disc-and-roller variable speed drive similar to that of the range clock also sat under the dumaresq. Despite its fairly late appearance in design specifications, the handle for setting a bearing rate is clearly visible in drawings dating back to June 1912[8] and is perhaps illustrated in drawings dating from March 1912.[9]
The clock could be set to any rate between +/- 15 degrees per minute by a handle with an indicator scale jutting out from the base of the dumaresq housing.[10]
Spotting Corrector
[TO BE CONTINUED - TONE] this largely is correct for Mark I table but not Mark III
The spotting corrector in the 1918 handbook features:
- Output worm shaft for the plot range pencil holder
- Spotting handle to enter corrections
- Straddle correction hand (for applying corrections from a Dreyer Calculator)
- A digital Gun range counter (on the table)
- Commutator to relay gun range to control positions and conning tower
- A flexible shaft to carry gun range to the deflection drums of the standard bearing plot
A hand-worked pedalling clutch located near the tuning handle allowed the plotted range to be tuned without altering the gun range.
Range Plot
The Mark III's range plot set the pattern for those on the later tables Mark IV, IV*, V and probably II; a large surface placed on the right, with a range rate grid positioned over it.
Rate Grid The rate grid grew in sophistication by war's end, from one that had irregular markings to translate its wire angles to range rates to one with linear range rate markings, a flexible shaft to keep it aligned to the rate on the range clock, and a means of temporarily deflecting it to explore rates at variance with that set on the clock.
Plotting Range Cuts Like most of the tables, the Mark III tables' means of plotting range cuts evolved over time:
- Initially, a single Argo RF's ranges were plotted in a fully automatic manner. This mechanism could be disconnected in favor of manual penmanship should it fail or should the results of more (or simply other) RFs want to be plotted.
- Ambitions for replacing this with a means of plotting cuts from multiple RFs were probably alluding to the failed Macnamara's Plotter.
- Manual Brownrigg Keyboards were used on many Dreyer tables by Jutland, but it is unclear which Mark III tables might have had this in place of their initial automated plotting mechanism.
- Manual Range Typewriters were deployed widely in 1917.[11]
Range Pencils Initial production tables had a single red pencil to plot clock range. As early drawings imply it was first installed, it appears that the tuning handle had no pedalling clutch and so intrinsically altered clock range and gun range when it was used. This implies that the tuning handle would only be used at the beginning of an encounter.
| Plotting Ranges | 2,000 - 16,400 yards (a +8,000 yard extended scale added later allowed plotting to 24,400 yards)[12] |
| Paper width | 36 inches |
| Scale | 400 yards/inch |
| Paper speed | 2 inches / minute |
The extended range scales were likely fitted to tables as opportunity around around the time (1915?) such a modification was made to ???? (Brooks)[Citation needed].
Bearing Plot
On plans drawn up in 1912-1913 and outlined in a Technical History drafted by Dreyer, the bearing plot was on paper 15 inches wide with a simple rate grid whose irregular edge markings as it was rotated converted the angle of rotation into a number of degrees per minute of bearing rate. By February, 1913, a single deflection drum could convert the bearing rate of the grid's inclination to a gun deflection.[13]
The Handbook for Capt F.C. Dreyer's Fire Control Tables, 1918 indicates that these were at some point to be provided with standard bearing plots[14], but these units received such scant service before the introduction of G.D.T. gear that it is hard to bank that many were actually fitted.
Deployment
The Dreyer Handbook of 1918 lists some ships with Mark III tables, with those no longer in active service crossed out by hand at some later date, and those lost before promulgation not listed at all. Those appearing in that document are footnoted below[15].
In 1913, Dreyer listed the ships he claimed actually received the first five Mark III tables delivered.[16] The five shipboard installations are confirmed in a Grand Fleet Weekly Order from March, 1914.[17]
| Ship using Mark III table | Date equipped | Notes |
| King George V[16][15] | 1913 or earlier through mid 1918 or beyond | retained to end of service[18] |
| Thunderer[16][15] | 1913 or earlier through mid 1918 or beyond | retained to end of service[Inference] |
| Monarch[16][15] | 1913 or earlier through mid 1918 or beyond | retained to end of service[Inference] |
| Lion[16] | 1913 or earlier through Jutland at least,[Citation needed] certainly from 27 March 1914[17] | replaced at some point with Mark IV* table |
| Princess Royal[16] | 1913 or earlier through Jutland at least[Citation needed] certainly from 27 March 1914[17] | replaced at some point with Mark IV* table |
| Excellent[15] | acquired after Jutland | probably taken from Lion or Princess Royal |
| Chatham Gunnery School[15] | acquired after Jutland | probably taken from Lion or Princess Royal |
From these two sources, it seems possible to trace the service of 5 tables. The first three ships received tables upon completion (or soon thereafter), and retained them through the war, but Lion and Princess Royal sent their original tables to the 2 training establishments sometime after Jutland but before mid 1918 when they are listed in the Dreyer Handbook as having Mark IV* tables, which must have been new units owing to the availability of 2 for the shore facilities.
See Also
Footnotes
- ↑ Brooks. Dreadnought Gunnery and the Battle of Jutland. p. 159.
- ↑ Dreyer & Usborne. Technical History, pp.47-8.
- ↑ this is somewhat ambiguously stated
- ↑ This was not to materialise until the advent of the Electrical Dumaresq
- ↑ Brooks. p. 169.
- ↑ Brooks. p. 169, footnote 141.
- ↑ Dreyer Handbook, 1918 p. 90.
- ↑ Technical History, Fig. 7.
- ↑ Technical History, Fig. 4.
- ↑ Technical History, Figs. 3, 7.
- ↑ Brooks. Dreadnought Gunnery, p. 173.
- ↑ Dreyer Handbook, 1918 p. 17.
- ↑ , pPollen Aim Corrector System, Part I. Technical History and Technical Comparison with Commander F. C. Dreyer's Fire Control System, pp. 47-8.
- ↑ Handbook for Capt F.C. Dreyer's Fire Control Tables, 1918. pp. 13-15.
- ↑ Jump up to: 15.0 15.1 15.2 15.3 15.4 15.5 Handbook of Captain F.C. Dreyer's Fire Control Tables, 1918. p. 3.
- ↑ Jump up to: 16.0 16.1 16.2 16.3 16.4 16.5 Dreyer & Usborne. Technical History. pp. 11-2.
- ↑ Jump up to: 17.0 17.1 17.2 order NS14083/14, 27 March 1914, ADM 182/5, thanks to Mark Harris
- ↑ not listed as having another, and decommissioned soon after that source's publication
Bibliography
- Admiralty, Gunnery Branch (1918). Handbook of Captain F. C. Dreyer's Fire Control Tables, 1918. C.B. 1456. Copy No. 10 at Admiralty Library, Portsmouth, United Kingdom.
- Brooks, John (2005). Dreadnought Gunnery and the Battle of Jutland: The Question of Fire Control. Oxon: Routledge. ISBN 0714657026. (on Amazon.com and Amazon.co.uk).
- Brooks, John (2001). Fire Control for British Dreadnoughts: Choices of Technology and Supply. Unpublished PhD Thesis. London: Department of War Studies. King's College, London.
- Roberts, John A. (1992). Anatomy of the Ship: The Battleship Dreadnought. London: Conway Maritime Press. ISBN 085177895X. (on Amazon.com and Amazon.co.uk).
- Dreyer, Frederic; Usborne, Cecil through Gunnery Branch, Admiralty. (1913). Pollen Aim Corrector System, Part I. Technical History and Technical Comparison with Commander F. C. Dreyer's Fire Control System. P. 1024. in Admiralty Library, Portsmouth.


